





Asset inventory · NVD + OSV.dev matching · CPE auto-resolution · KEV/EPSS · Finding triage · Background monitoring · Web dashboard · Dockerized
Quick start · Features · How matching works · Dashboard · Auth · API · Deployment · Issues
Tell it what software you run. Learn which CVEs actually affect it. CVE Watcher keeps an inventory of your assets and matches each one against the NIST NVD — precisely by CPE, automatically by product name, or by keyword as a last resort. Self-hosted, JWT-secured, with a no-build web dashboard and a clean JSON API.
CVE Watcher is a self-hostable FastAPI service that turns the list of software you run into an always-current view of the vulnerabilities affecting it. You register assets (a name and a version is enough), and it queries the NIST NVD (and OSV.dev for language ecosystems) on demand or on a schedule, then deduplicates and ranks findings by severity.
# add an asset — just a name and a version — and list its CVEs
# (full walk-through in the End-to-End Example below)
curl -s "$BASE/assets/$ASSET/vulnerabilities" -H "Authorization: Bearer $TOKEN" | python3 -m json.tool
# → 2 vulnerabilities (CVE-2023-44487 HIGH 7.5 · CVE-2025-23419 MEDIUM 4.3)- Asset inventory — track software with name, version, optional CPE, ecosystem and description, scoped per user.
- SBOM import — upload a CycloneDX or SPDX JSON SBOM to create one asset per package in one go, each with its OSV.dev ecosystem taken from the package URL (purl).
- Precise CVE matching — NVD
cpeNamelookups evaluate version ranges server-side (no keyword 100-result cap). - Automatic CPE resolution — derive a CPE from a product name via the NVD CPE dictionary.
- Keyword fallback — free-text NVD search with local product/version filtering to cut the noise.
- OSV.dev for packages — assets that declare an ecosystem (PyPI, npm, Go, Maven, …) are matched on OSV.dev, plus NVD when they also carry a CPE; CVSS vectors are parsed into a base score and severity band.
- Exploitation intelligence — every finding is flagged with CISA KEV (actively exploited in the wild) and scored with FIRST.org EPSS (exploit probability), and results are ranked KEV-first.
- Finding triage — mark each finding
open/acknowledged/fixed/false_positive/accepted_risk; suppressed states are hidden by default. - Global findings view — a cross-asset summary and table (
/findings) with severity/status counts and CSV/JSON export. - Search, filters & sorting — filter by severity, status and time window; search by CVE or asset; sort every column.
- Background monitoring — opt-in scheduler that rescans assets and alerts on new CVEs, plus an optional per-user email digest.
- Prometheus metrics — aggregate assets and findings exposed at
/metrics. - Web dashboard — redesigned single-page UI (vanilla JS + hand-written CSS, no build step, no CDN) with Overview / Assets / Vulnerabilities sections and light/dark themes.
- Secure JSON API — JWT auth, per-user isolation, OpenAPI docs at
/docsand/redoc. - Accounts & single sign-on — email confirmation, password change and reset by email, account deletion, and sign-in through any number of OpenID Connect providers (Google, Keycloak, Entra ID, …), one button each.
- Self-hosted — PostgreSQL + Alembic migrations, shipped as a Docker image on GHCR and Docker Hub.
- Docker and Docker Compose (recommended), or
- Python >= 3.13 and a PostgreSQL database for a local run
git clone https://github.com/mangrisano/cvewatcher.git
cd cvewatcher
cp .env.example .env
docker compose -f docker/docker-compose.yml up --build
Then open:
- API — http://localhost:8000
- Interactive docs (Swagger UI) — http://localhost:8000/docs
- Web dashboard — http://localhost:8000/dashboard
A self-contained single-page dashboard is served at
/dashboard. It needs no build step and no
CDN (vanilla JavaScript + hand-written CSS), keeps the JWT in localStorage,
and has light and dark themes (toggle in the user menu). It is organised into
three sections:
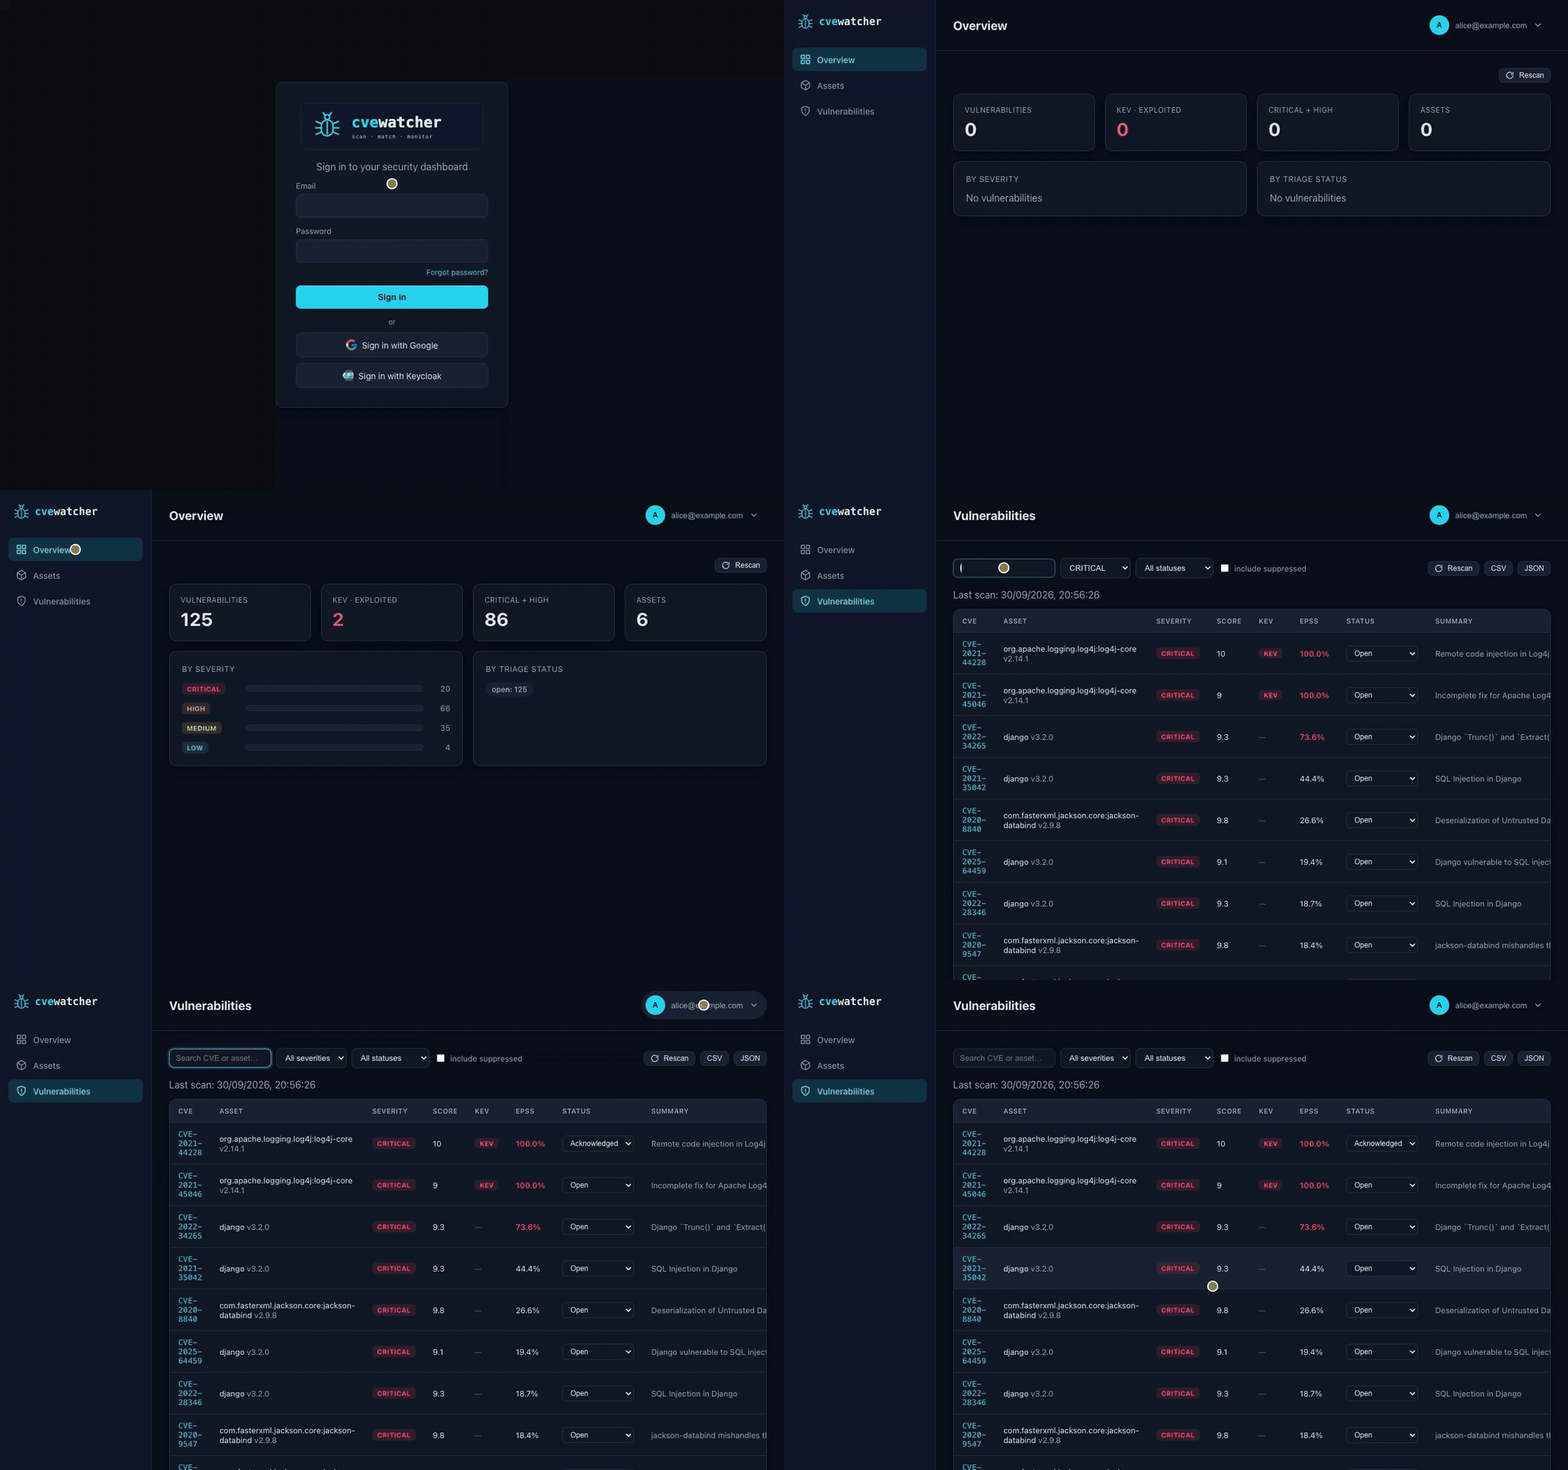
- Overview — your security posture at a glance: total findings, KEV (actively exploited) count, Critical + High count and asset count, plus breakdowns by severity and by triage status.
- Assets — full inventory management: add / edit / delete assets (with an optional ecosystem to enable OSV.dev), import an SBOM and filter by name.
- Vulnerabilities — a cross-asset table of every finding, each with a linked CVE id, colour-coded severity badge, CVSS score, KEV badge, EPSS probability and an inline triage status selector. You can search by CVE or asset, filter by severity/status, toggle suppressed findings, sort any column, page through the results (50 per page), export to CSV/JSON, and Rescan to scan all your assets now.
The dashboard reads findings from the database, as stored by the last scan, so it stays fast with thousands of findings and keeps working when NVD or OSV.dev are down. A new, imported or re-identified asset is scanned in the background right away; the Vulnerabilities page shows when the last scan ran.
If the NIST NVD service cannot be reached, the dashboard surfaces the error rather than an empty list — an empty result only means NVD reported no matching CVEs.
The login card can toggle to a registration form, but public sign-up is
closed by default: only the very first account (bootstrap) can always
register — after that, new sign-ups require REGISTRATION_ENABLED=true (see
Authentication & Access Control). When
single sign-on is configured, the card also shows one Sign in with … button
per provider. The user menu offers Change password (accounts with a password)
and Delete account. Sessions
refresh themselves silently in the background using the refresh token, so you
stay signed in without re-entering credentials until the refresh token itself
expires (JWT_REFRESH_TOKEN_EXPIRE_DAYS). Refresh tokens are single-use: each
refresh returns a new one, so a stolen token stops working as soon as the real
user refreshes.
| Variable | Default | Description |
|---|---|---|
REGISTRATION_ENABLED |
false |
Allow new sign-ups after the first (bootstrap) account is created |
REGISTER_MAX_ATTEMPTS |
5 |
Max /auth/register attempts per IP within the window |
REGISTER_WINDOW_SECONDS |
3600 |
Rate-limit window (seconds) for registration attempts |
LOGIN_MAX_ATTEMPTS |
5 |
Max failed /auth/login attempts per email+IP within the window |
LOGIN_IP_MAX_ATTEMPTS |
30 |
Max failed /auth/login attempts per IP (any account) within the window |
LOGIN_WINDOW_SECONDS |
300 |
Rate-limit window (seconds) for failed login attempts |
JWT_ACCESS_TOKEN_EXPIRE_MINUTES |
30 |
Access token lifetime; the dashboard refreshes it silently on expiry |
JWT_REFRESH_TOKEN_EXPIRE_DAYS |
7 |
Refresh token lifetime; expiry forces a real re-login |
PUBLIC_URL |
(unset) | Base URL users reach the app at (e.g. https://cvewatcher.example.com); enables password reset by email |
The very first account created on a fresh install always succeeds — this
bootstrap exception lets you stand up an admin user without pre-configuring
anything. Once at least one user exists, further registration is gated by
REGISTRATION_ENABLED. Check GET /auth/registration-status to see whether
sign-up is currently open.
Forgot password: when SMTP (NOTIFY_EMAIL_HOST …) and PUBLIC_URL are
both set, the login card shows Forgot password?. The user gets an email with
a link valid for 30 minutes; it works once, a newer request voids it, and only
a hash of it is stored. Setting a new password signs out every session. The
link is built from PUBLIC_URL, never from the request's Host header, so a
forged request cannot point it at another site. Without email, an admin resets
a password with utils/reset_password.py.
Email confirmation: with the same settings, a new sign-up stays inactive
until its owner opens the link emailed to them (valid 24 hours). Signing in
before that returns 403 (only after a correct password, so it never reveals
which addresses have accounts) and the login card offers a new link. Accounts
that existed before this feature, and all accounts when email is not
configured, are active as usual; resetting the password also confirms the
address.
Single sign-on (OpenID Connect): the login card shows one Sign in with …
button per configured provider. Any standard provider works (Google, Keycloak,
Microsoft Entra ID, Okta, Authentik, …). Each one is a set of variables named
OIDC_PROVIDERS__<ID>__<SETTING>, where <ID> is a name you choose (letters,
digits and _); adding a provider needs no code change. PUBLIC_URL must be
set, and every provider must have PUBLIC_URL/auth/oidc/callback registered as
a redirect URI.
| Setting | Default | Description |
|---|---|---|
ISSUER |
(required) | Issuer URL of the provider; must equal the iss of its tokens |
CLIENT_ID |
(required) | Client ID registered at the provider |
CLIENT_SECRET |
(unset) | Client secret; leave empty for a public client (PKCE is always used) |
DISCOVERY_URL |
(issuer) | Where the app itself fetches the discovery document, when it reaches the provider at another host |
NAME |
(the id, capitalised) | Name on the login button |
ICON |
(the id) | Icon from app/static/img/providers/<ICON>.svg; no file, no icon |
SCOPES |
openid email profile |
Scopes requested |
AUTO_CREATE |
true |
Create an account on first sign-in; false only lets in addresses that already have one |
ALLOWED_DOMAINS |
(any) | Comma-separated email domains allowed to sign in |
PUBLIC_URL=https://cvewatcher.example.com
OIDC_PROVIDERS__GOOGLE__ISSUER=https://accounts.google.com
OIDC_PROVIDERS__GOOGLE__CLIENT_ID=1234-abc.apps.googleusercontent.com
OIDC_PROVIDERS__GOOGLE__CLIENT_SECRET=...
OIDC_PROVIDERS__GOOGLE__ALLOWED_DOMAINS=example.com
OIDC_PROVIDERS__CORP__ISSUER=https://sso.example.com/realms/corp
OIDC_PROVIDERS__CORP__CLIENT_ID=cvewatcher
OIDC_PROVIDERS__CORP__CLIENT_SECRET=...
OIDC_PROVIDERS__CORP__NAME=Company SSO
OIDC_PROVIDERS__CORP__ICON=keycloak
Icons ship for google and keycloak; for another provider, drop its SVG in
app/static/img/providers/. The single-provider variables of 2.12.0
(OIDC_ISSUER, OIDC_CLIENT_ID, OIDC_CLIENT_SECRET, OIDC_DISCOVERY_URL,
OIDC_PROVIDER_NAME, OIDC_SCOPES, OIDC_AUTO_CREATE,
OIDC_ALLOWED_DOMAINS) still work, as a provider with the id default.
The app uses the authorization code flow with PKCE, state and nonce, and
accepts only ID tokens signed with an asymmetric key published by the
provider. A person is recognised by the provider's issuer and subject; on the
first sign-in with a provider, the account with the same email is linked, or
created (registration gating does not apply: the provider decides who gets
in). One account can be linked to several providers, but to one identity per
provider. The provider must vouch for the address (email_verified),
otherwise the sign-in is refused. Accounts created this way have no password:
they cannot change one, and confirm deletion by typing their email. Local
passwords keep working next to SSO.
With a public provider such as Google, anyone with an account there could
sign in and get an account here: set its ALLOWED_DOMAINS or
AUTO_CREATE=false.
To try it locally, docker compose --profile oidc up -d (from docker/)
starts a Keycloak at http://localhost:8081 (admin console: admin/admin)
with a cvewatcher realm and two users: alice/alice-password (verified
email) and mallory/mallory-password (unverified, refused). Configure the
app with:
PUBLIC_URL=http://localhost:8000
OIDC_PROVIDERS__KEYCLOAK__ISSUER=http://localhost:8081/realms/cvewatcher
OIDC_PROVIDERS__KEYCLOAK__DISCOVERY_URL=http://keycloak:8080/realms/cvewatcher/.well-known/openid-configuration
OIDC_PROVIDERS__KEYCLOAK__CLIENT_ID=cvewatcher
OIDC_PROVIDERS__KEYCLOAK__CLIENT_SECRET=cvewatcher-dev-secret
The browser reaches Keycloak at localhost:8081, the app container at
keycloak:8080: DISCOVERY_URL covers the second, while tokens keep the
public issuer. This realm is for development only.
Behind a reverse proxy (nginx, traefik, …) rate limits are keyed on the
client IP, so uvicorn must trust the proxy's X-Forwarded-For: set
FORWARDED_ALLOW_IPS to the proxy's IP or subnet (e.g. the Docker network).
Otherwise every client appears as the proxy and shares one limit. Avoid *
unless port 8000 is reachable only through the proxy: anyone reaching it
directly could forge the header and bypass the limits.
CVE Watcher matches an asset to CVEs in three ways, chosen automatically:
- CPE lookup — if the asset has a CPE 2.3 id, the query is delegated to
NVD's
cpeNamefilter, which evaluates version ranges server-side. Partial CPEs are padded to the full 13-component form. - Automatic CPE resolution — with no CPE, the product name is looked up in
NVD's CPE dictionary (applications, operating systems and hardware),
following
deprecatedBylinks. A candidate matches only on an exact (separator-insensitive)productorvendor+product, soApache HTTP Serverresolves toapache:http_serverwhilenginxnever pulls innginx_proxy_manager. The asset version is injected and the lookup from step 1 runs for each resolved pair. - Keyword search — last resort when the name can't be resolved: an NVD keyword search filtered locally by product identity and version range, falling back to the CVE summary when a CVE carries no CPE data.
OSV.dev covers assets that declare an
ecosystem(PyPI, npm, Go, Maven, …), the domain NVD/CPE matches poorly. Such an asset is looked up on OSV.dev only, unless you also give it a CPE: then NVD is queried too, and the results are merged and deduplicated by CVE. This keeps a large SBOM import from exhausting NVD's rate limit. CVSS vectors are parsed into a base score and severity band.
You usually only need a name and a version — a CPE is an optional precision lever. Provide one when the name you track differs from the canonical token (e.g.
IISiscpe:2.3:a:microsoft:internet_information_services); look it up in the NVD CPE dictionary.
The application can periodically scan every registered asset against the NIST NVD
and alert on newly discovered vulnerabilities. It is opt-in and configured via
environment variables (see .env.example):
| Variable | Default | Description |
|---|---|---|
MONITOR_ENABLED |
false |
Enable the background scheduler |
MONITOR_INTERVAL_MINUTES |
360 |
Minutes between scans |
SCAN_NEW_ASSETS |
true |
Scan an asset as soon as it is added or changed |
ENRICH_ENABLED |
true |
Add CISA KEV flag + FIRST.org EPSS score |
DIGEST_ENABLED |
false |
Email each user a periodic digest of findings |
DIGEST_INTERVAL_MINUTES |
1440 |
Minutes between digest emails |
NOTIFY_CONSOLE |
true |
Log alerts via the application logger |
NOTIFY_WEBHOOK_URL |
(unset) | POST every alert as JSON to this URL |
NOTIFY_SLACK_WEBHOOK_URL |
(unset) | Post every alert to a Slack incoming webhook |
NOTIFY_EMAIL_HOST … |
(unset) | SMTP relay for all emails (see .env.example) |
When enabled, a scan runs at startup and then on the configured interval. An
alert is raised when a CVE is first found on an asset, and when a known one
enters the CISA KEV catalog or its severity rises (NVD often publishes
CVEs unscored and rates them days later). Each alert includes the KEV flag and
EPSS score. Manual scans (/assets/{id}/monitor, /assets/monitoring/scan-all)
raise the same alerts. Scans of the same asset never overlap, so a finding is
announced once even if a manual scan starts while another is running.
Manual scans and GET /cves/search query NVD live, so each user gets
LIVE_LOOKUPS_PER_HOUR of them (default 30); past that they answer 429
with Retry-After. Reading stored findings is never limited.
Alerts go to two audiences:
- Admins receive every alert on the
NOTIFY_*channels; the email feed goes toNOTIFY_EMAIL_TOand to every address inADMIN_EMAILS. - Each user receives the alerts on their own assets, by email to their account address (always on when SMTP is configured) and optionally on their own Slack, Microsoft Teams or Discord webhook, or Telegram bot. In the dashboard (user menu → Notifications) each user picks the minimum severity (default High), whether KEV findings always alert, and whether to be told about escalations. Findings marked fixed or false positive never alert; accepted risk ones only alert when they enter KEV.
Independently, DIGEST_ENABLED emails each user a periodic digest of their
active findings.
GET /auth/registration-status- Check whether public sign-up is currently open (open), whether password reset by email is available (password_reset) and the single sign-on providers (oidc: a list of{id, name, icon}, empty when off)POST /auth/register- Register new user (subject to registration gating and rate limiting)POST /auth/login- User login (rate-limited per email+IP)POST /auth/refresh- Exchange a refresh token for a new access token and a new refresh token (the one sent is revoked: store the new one)POST /auth/logout- Logout user (revokes access and refresh tokens)POST /auth/forgot-password- Email a reset link toemail; the answer is the same whether or not the account exists (3 per address and 10 per IP per hour)POST /auth/reset-password- Setnew_passwordwith thetokenfrom the link; signs out every sessionPOST /auth/verify-email- Confirm a new account with thetokenfrom the emailed linkPOST /auth/resend-verification- Email a new confirmation link toemail(same generic answer and limits asforgot-password)GET /auth/oidc/login?provider=<id>- Start single sign-on: redirects to that provider (providermay be left out when only one is configured)GET /auth/oidc/callback- Where the provider sends the user back; redirects to the dashboard with a one-time code valid 60 secondsPOST /auth/oidc/exchange- Trade thatcodefor an access and refresh token pair (works once)
POST /assets/- Create new assetPOST /assets/import-sbom- Create assets from a CycloneDX or SPDX JSON SBOM (max 5 MB, 2000 components)GET /assets/- List user's assetsGET /assets/{asset_id}- Get specific asset detailsPATCH /assets/{asset_id}- Update asset informationDELETE /assets/{asset_id}- Remove asset
GET /assets/{asset_id}/vulnerabilities- The asset's findings from its last scanPATCH /assets/{asset_id}/vulnerabilities/{cve_id}- Set a finding's triage statusGET /assets/{asset_id}/monitor- Monitor single asset for CVEsPOST /assets/monitoring/scan-all- Scan all user assetsGET /assets/monitoring/report- Report of recent CVEs from the last scans
GET /findings- Cross-asset findings from the last scan: counts plus one page (limit≤ 500,offset), filtered byseverity,status,q,days, sorted bysort/order;?refresh=truescans firstGET /findings/export- Export findings as CSV or JSON (?format=csv|json)
GET /cves/fetch-recent- Fetch and store recent CVEs from NIST NVD (admin only:ADMIN_EMAILS)GET /cves/recent- List stored CVEs that affect your assetsGET /cves/search- Search CVEs by product (and optional version)GET /cves/vulnerabilities- All findings across your assets, from the last scans
GET /user- Get the current user's profile, includinghas_passwordandsso(linked to a single sign-on provider)DELETE /user- Delete your account with its assets, findings and settings:{"password": "..."}, or{"confirm_email": "..."}for an account without a password (single sign-on). Wrong confirmations are rate-limited; the owner gets an email when SMTP is configuredPOST /user/password- Change your password:current_password+new_password. Signs out every other session and returns a fresh token pair for this one; the owner gets an email when SMTP is configured. Wrong current passwords are rate-limited (5 per 15 minutes)GET /user/notifications- Your alert settings (webhook URLs and bot tokens are never returned, only whether they are set)PUT /user/notifications- Update them:min_severity,always_kev,escalations,slack_webhook_url,teams_webhook_url,discord_webhook_url,telegram_bot_token+telegram_chat_id(only the fields sent change;""removes a channel; each URL must be an HTTPS webhook of that service)POST /user/notifications/test- Send a test alert to your channels (5 per hour)GET /health- Service health checkGET /metrics- Prometheus metrics (aggregate assets & findings)
GET /dashboard- Single-page web dashboard (assets & vulnerabilities)
- Backend: FastAPI (Python)
- Database: PostgreSQL with SQLAlchemy ORM
- Authentication: JWT with joserfc; single sign-on through OpenID Connect (authorization code + PKCE)
- Migration: Alembic
- Scheduling: APScheduler (optional background monitoring)
- Container: Docker & Docker Compose
- External data: NIST NVD & OSV.dev, enriched with CISA KEV and FIRST.org EPSS (CVSS parsed with
cvss) - Frontend: single-page dashboard in vanilla JS + hand-written CSS (no build step, no CDN)
CVE Watcher ships as a Docker image and a Compose stack (app + PostgreSQL).
The Compose file lives in docker/, so pass it with -f (or cd docker
first). It reads configuration from .env in the repo root — copy
.env.example to .env before the first run.
docker compose -f docker/docker-compose.yml up --build -d   # start app + database in the background
docker compose -f docker/docker-compose.yml logs -f app     # follow the application logs
docker compose -f docker/docker-compose.yml down            # stop and remove the stack
Add --profile oidc to up to also start a development Keycloak for trying
single sign-on (see
Authentication & Access Control).
Every tagged release publishes the image to GHCR and Docker Hub. Point
your own Compose file or docker run at it instead of building locally:
docker pull ghcr.io/mangrisano/cvewatcher:latest          # GitHub Container Registry
docker pull micheleangrisano/cvewatcher:latest           # Docker Hub
Provide the database URL and secrets through environment variables (see
.env.example); never ship the defaults to production.
A complete flow from zero to a list of CVEs, using only the API. The same thing can be done click-by-click in the dashboard.
BASE=http://localhost:8000

# 1. Register a user
curl -s -X POST "$BASE/auth/register" \
  -H "Content-Type: application/json" \
  -d '{"username":"ciso","email":"ciso@example.com","password":"Password123"}'

# 2. Log in and capture the JWT access token
TOKEN=$(curl -s -X POST "$BASE/auth/login" \
  -H "Content-Type: application/json" \
  -d '{"email":"ciso@example.com","password":"Password123"}' \
  | python3 -c "import sys,json;print(json.load(sys.stdin)['access_token'])")

# 3. Add an asset — just a name and a version, no CPE needed
ASSET=$(curl -s -X POST "$BASE/assets/" \
  -H "Authorization: Bearer $TOKEN" -H "Content-Type: application/json" \
  -d '{"name":"nginx","version":"1.24.0","description":"edge reverse proxy"}' \
  | python3 -c "import sys,json;print(json.load(sys.stdin)['id'])")

# 4. Ask for its vulnerabilities (all time, any severity)
curl -s "$BASE/assets/$ASSET/vulnerabilities" \
  -H "Authorization: Bearer $TOKEN" | python3 -m json.tool
You can narrow the result with query parameters:
# Only HIGH severity, published in the last 365 days
curl -s "$BASE/assets/$ASSET/vulnerabilities?severity=HIGH&days=365" \
-H "Authorization: Bearer $TOKEN" | python3 -m json.tool| Query parameter | Values | Meaning |
|---|---|---|
severity |
CRITICAL / HIGH / MEDIUM / LOW |
Keep only findings at that severity |
days |
integer (e.g. 30, 90, 365) |
Only CVEs published in the last N days; omit or 0 for all time |
If NVD is unreachable the endpoint returns HTTP 503 rather than an empty list, so an empty
vulnerabilitiesarray always means "no known CVEs", never "the lookup failed".
Instead of adding packages one by one, generate an SBOM with a tool such as Syft and import it:
syft dir:. -o cyclonedx-json > sbom.json

curl -s -X POST "$BASE/assets/import-sbom" \
  -H "Authorization: Bearer $TOKEN" -H "Content-Type: application/json" \
  --data-binary @sbom.json | python3 -m json.tool
Each component with a package URL of a supported type (pypi, npm, golang,
maven, cargo, gem, nuget, composer, pub, hex) becomes an asset
with the matching ecosystem. The response lists what was skipped: packages you
already track (same name and version), names or versions too long to store, and
components without a supported purl. The new assets are scanned in the
background right after the import (see SCAN_NEW_ASSETS).
uv sync                                 # install dependencies into .venv
uv run ruff check app tests             # lint
uv run ruff format --check app tests    # formatting check
uv run pytest -q                        # run the test suite
The test suite mocks the NIST NVD client, so it never touches the network.
- Fork the repository
- Create a feature branch (
git checkout -b feature/amazing-feature) - Commit your changes (
git commit -m 'Add some amazing feature') - Push to the branch (
git push origin feature/amazing-feature) - Open a Pull Request
If CVE Watcher is useful to you, the best ways to support it are:
- Star the repo to help others discover it
- Open an issue for bugs or ideas
- Send a pull request
- Share it with others who track software vulnerabilities
This project is licensed under the MIT License.